| |
When logged in as a Compliance Manager, you will notice the left-hand
navigation bar has far fewer links then the regular Web sites. Here
is what you need to know about these sections:
Options
This link is almost the same as the Personal Information link on
the regular broker Web sites. Here you will enter your name, e-mail
address, phone, fax, login name, password, and choose whether you
would like to receive Agent submissions only, Compliance Review
results only, or both via E-mail. Here you can also select whether
the Glossary of Terms will be available to your assigned agents.
Back
to Top
Calculators
In this section
you select the calculators that will be available to your assigned
financial advisors. You can click on the name of each calculator
to preview it. After selecting the appropriate calculators, click
Save Changes to update all assigned agents' Web sites.
Back
to Top
Research
Articles
In
this section you select the research articles that will be available
to your assigned financial advisors. You can click on the name of
each research article to preview it. After selecting the appropriate
research articles, click Save Changes to update all assigned agents'
Web sites.
Back
to Top
Newsletters
In
this section you select the newsletters that will be available to
your assigned financial advisors. You can click on the name of each
newsletter to preview it. After selecting the appropriate newsletters,
click Save Changes to update all assigned agents' Web sites.
Back
to Top
Assigned
Agents
The
Assigned Agents link on the left-hand side of your Compliance Manager
Site Administrator will take you to the Assigned Agents summary
screen that is shown below. This is where you have several options
to customize the disclaimer page for every agent who is assigned
under your Compliance Manager. Here you are also able to assign
the states in which the agent is licensed.

- Licensed
States
Click on this link to select which states the agent is licensed
in.
- Default
Disclaimer
Click this link to view the custom disclaimer summary for that
particular agent. By clicking the Edit button on the custom disclaimer
summary (shown below), you will be able to change all of the disclaimer
options for that particular agent. The custom disclaimer options
are also explained below.

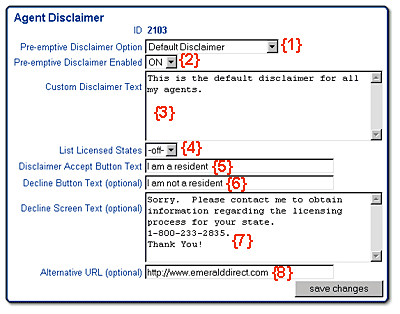
Note:
Once you have created a default disclaimer, you can assign one or
all of your agents to this default. Simply select "Default
Disclaimer" in the pull-down menu (#1) and turn "ON"
items #2 and #4. The remaining boxes
on this screen are used only
when the "Preemptive Disclaimer Option"
is set to "Custom."
- Preemptive
Disclaimer Options
This option-drop down menu allows you to choose from 4 different
disclaimer options:
• No Disclaimer - when no disclaimer is required or
desired for that agent.
• Default Disclaimer - To set the agents disclaimer
screen to the default disclaimer that you previously created.
• Custom Disclaimer - To customize the disclaimer
for just that particular agent.
• Agent-Controlled Disclaimer - To allow the agent
to control and customize the disclaimer before it is posted for
review to the compliance manager.
Note: When custom text has been entered
into an agent disclaimer edit screen, the saved text will remain
in the edit screen, even when no disclaimer or default disclaimer
has been selected in the drop-down menu. The
page will, however, display according to the preemptive disclaimer
option you select.
- Preemptive
Disclaimer Status
The agents disclaimer can be turned on or off with this drop-down
menu without affecting the custom text that might have already
been entered.
- Disclaimer
Text
Use this field to define or edit text that you intend for
the opening message of the disclaimer screen.
- Licensed
States On/Off
Use this button to activate or deactivate a standard sentence
containing the agent's name, and the licensed states you entered
for that agent using the "licensed states" link by that
agent's name on the assigned agents screen.
- Disclaimer
Acceptance Button Text
Add the text that you would like to appear on the disclaimer
acceptance button here. This button will take the client into
the agent's site.
- Disclaimer
Decline Button Text
This optional field creates a decline button and defines
the text that will appear on that button. A decline button will
not appear on the disclaimer page, unless there is text input
into this field. When clicked, the decline button will take the
client to a disclaimer decline screen that can also be customized.
- Disclaimer
Decline Screen Text
Add the text that you would like to appear on the disclaimer
decline screen here. This text is optional and will be necessary
only if you create a disclaimer decline button.
- Alternative
URL
If you choose, you can add a link to the disclaimer decline screen
that will take the visitor to a Web site of your choice. The link
will be created only if you create a disclaimer decline screen
and add a full URL here.
Back
to Top
Agent
Updates
The Agent Updates link is where specific
"material change" update information is stored and awaiting compliance
approval. There are several important features of this area that
must be known by the manager(s) before proper compliance approval
can be met.
- Advisor
Name & Text Field
The name of the agent, the field to be edited, the current text
that is on the agent's site, when the change was submitted, and
the new text that the agent is proposing, is all held in this
field. The Preview Change link, which allows the Branch and Compliance
Manager to view the agent's Web site with the proposed changes
included, is also here. Note: Compliance and Branch Managers can
edit the Proposed Text field before submitting their approval.
- Accept,
Reject Field
Either the Accept or Reject button MUST be pressed in order for
the changes in that particular field to be processed, and the
compliance e-mails to be sent. Without one of these being selected,
any changes made to the proposed text will not be made even with
the Process Updates button being clicked. A reason for rejecting
the proposed text can also be entered here and will be included
in the e-mail to the corresponding agent.
- Process
Updates
This button processes all of the accepted or rejected fields in
the Pending Web Site Updates section. An e-mail is sent to all
corresponding agents, and a copy of the e-mail is also sent to
the Branch or Compliance Manager for referance or archive purposes.
Any accepted fields are automatically updated to the agent's live
Web site.
Back
to Top
Default
Disclaimer
It
is now possible for compliance managers to add a preemptive disclaimer
page to any agent site(s) that may require them. When activated,
the disclaimer page will act as the portal to the agent's Web site,
allowing clients to enter only after they have read and agreed with
or denied the posted disclaimer. The following section will explain
how to set up a default disclaimer page, as well as how to create
custom disclaimer pages for your assigned agents.
The default disclaimer link on the left-hand side of your Compliance
Manager Site Administrator will take you to the default disclaimer
summary screen that is shown below. The last saved default information
that has been entered will appear here.
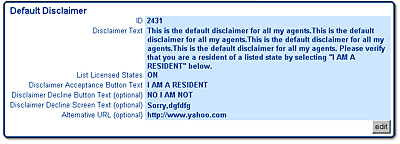
To
change this information, simply click the Edit button, which takes
you to the default disclaimer edit screen, explained below:
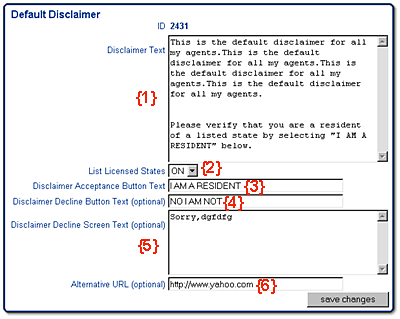
- Disclaimer
Text
Add a message of any length that you would like to appear
as the main introductory text for the preemptive disclaimer.
- Licensed
States On/Off
This switch activates a standard disclaimer sentence that
lists an agent's name, the words "is licensed in the following
states," and a list of that agent's licensed states. The
states listed will be pulled from the "licensed states"
screen that is accessible from the link beside any agent's name
on the assigned agents screen.
- Disclaimer
Acceptance Button Text
You can also define the text that will appear on the face
of the "disclaimer acceptance button." When pressed,
this button will take a visitor to the home page of that agent's
Web site.
- Disclaimer
Decline Button Text
This optional field adds text to a decline button.
This button will appear only if there is text input into this
field. When clicked, the decline button will take the client to
a disclaimer decline screen that you create.
- Disclaimer
Decline Screen Text
Add the text that you would like to appear on the disclaimer
decline screen here. You need to define this text only if you
create a "disclaimer decline button."
- Alternative
URL
If you choose, you can add a link to the disclaimer decline screen
that will take the visitor to a Web site of your choice. The link
will be created only if you create a disclaimer decline screen
and add a full URL here.
Back
to Top
New
Site Defaults
Here is where you define default text that will be used to pre-populate
the Web site data fields of any new agents that are assigned to
you. You can use [name] to represent the agent's name (include the
square brackets), and the name will be substituted at the time the
site is created.
Back
to Top
©
2001 Emerald Publications
|