| |
The following is an in-depth explanation of the Web Site Administrator:
Personal
Information
A
summary screen appears when you click the personal info link in
the site manager. Click Edit to input changes, and you will see
the following screen...
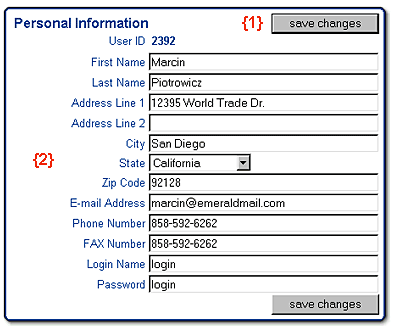
- Save
Changes Button
Saves all the user input information to the database.
-
Personal
Info Input area
Please fill out this information completely and accurately,
because it will be used to contact you in case any changes or
updates are proposed or made to the Web site by the site administrator
or for compliance reasons. You can also reassign the user name
and password for your site here.
Note: None of this information will be displayed
on your agency site; it is for administrative purposes only.
Web
Site Wizard
Setting
up your site for the first time is a snap. Just follow the step-by-step
instructions on each page of the setup wizard, and you'll have content
on your site in no time. The Web site wizard allows you to create,
save, and post content to your site. For experienced users, or those
who wish to selectively edit content for their site, the "My
Company Info" section offers direct links to access and administrated
individual content fields.
Back
to Top
Web
Site Options
A
summary screen appears when you click the Web Site Options link
in the site manager. Click Edit to input changes, and you will see
the following screen...
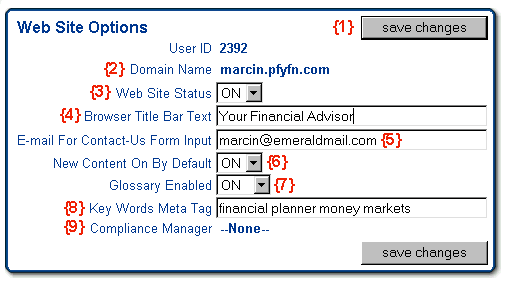
- Save
Changes Button
Saves all the user input information to the database.
- Domain
Name
Make sure this name matches the domain name you registered
for the site. If you believe the domain name has been entered
incorrectly, contact Web site technical support for assistance.
(1-800-233-2834)
-
Web
Site Status
This switch allows you to activate or deactivate an "Under
Construction" page for your site. Although you can activate
your site at any point, if you are assigned to a compliance
manager you can only activate content that has been approved
by the designated compliance officer. We recommend you set
your site status switch to "OFF" until your site
has been completely approved for the first time by your compliance
officer.
-
Browser
Title Bar Text
You can use this field to customize the text that appears
in the title bar area of any browser application that is visiting
your Web site.
-
E-mail
For Contact Us Form Input
This e-mail address is used as the destination for
all e-mails submitted through the "Contact Us"
form on your Web site. This e-mail address is transparent
to the user - it is not displayed anywhere on the Web site.
Please don't use HTML tags in this field.
-
New
Content On by Default
Each month, Emerald adds new content to the system.
This switch determines whether that content is automatically
added to your live Web site, or simply added to your site
manager for you to review and manually add to the live
site. If you are assigned to a compliance manager, this
feature will work only if your compliance officer has
set the compliance manager to the New Content On By Default
position as well.
-
Glossary
Enabled
This toggle adds or removes the Glossary button and
feature from your Web site. The Glossary feature is a
comprehensive dictionary of financial terms and definitions
that relate to concepts a visitor might encounter while
reading the newsletters and articles on your Web site.
-
Key
Words Meta Tags
Meta tags are words that are added to the invisible
HTML header of your Web site. These tags are used by
many search engines to catalogue and evaluate your site.
Choose key words that describe your services, yourself,
and your site. Although Meta tags are helpful, the most
effective way to register your site with a search engine
is to contact that service directly and apply for a
listing. Resources are available through Web site technical
support to assist you in Search Engine Registry. Phone
1-800-233-2834 and ask for a Web site technical support
consultant.
-
Compliance
Manager
If you are assigned to a compliance manager to
filter your content, the name of the compliance officer
or organization will appear here. You cannot edit
this field. Please contact tech support if you feel
there has been an error in your compliance manager
assignment.
Back
to Top
My
Company Info
The
My Company Info section provides instant access to any of the customizable
fields on your site. Text can be entered into any of the following
fields.
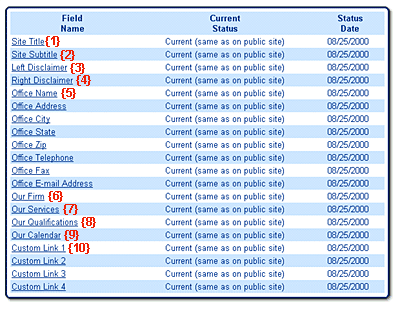
- Site
Title
Input the agency name that will appear on the Web site homepage
and titlebar.
- Site
Subtitle
Describe all details of your agency's expertise and the areas
that define your agency. This description will appear on the Our
Agency page of the Web site and is considered material, which
makes it subject to approval by your home office compliance manager.
- Left
Disclaimer
Input the mission statement of your agency here. Remember
that this text will appear on the front page of the agency Web
site and is considered material, which makes it subject to approval
by your home office compliance manager.
- Right
Disclaimer
Enter the What's New page title and text here. This text will
appear on the What's New section of the Web site and is considered
material, which makes it subject to approval by your home office
compliance manager.
-
Our
Location Info (Name, Address, City, State, Zip, Telephone,
Fax, E-mail Address)
Enter the contact and location information for your office.
This information will be displayed on the "Our Location"
page. The e-mail address you enter will be displayed as a hyperlink.
Clicking this link will launch an email application to the users
computer and will pre-populate the e-mail with you as the intended
recipient.
- Our
Firm (Default) or User Selected Link
This is the very first link in the left menu of your Web site
home page. If you kept the Emerald default link then the words
"Our Firm" will appear here. Click the link to access
the content customization subscreen. If you chose to override
the default setting by typing a different link title in the "Customize
Sections" screen, then the title you created for that
link will appear here. Click the link to access the content customization
subscreen for your customized section.
- Our
Services (Default) or User Selected Link
You can keep the Emerald default and click this link to enter
detailed information about your services, or create a different
link title in the "Customize
Sections" screen.
- Our
Qualifications (Default) or User Selected Link
You can keep the Emerald default and click this link to enter
detailed information about your services, or create a different
link title in the "Customize
Sections" screen.
- Our
Calendar (Default) or User Selected Link
You can keep the Emerald default and click this link to enter
detailed information about your services, or create a different
link title in the "Customize
Sections" screen.
- Custom
Links
You can create your own custom Web site sections using the
"Customize Sections"
screen in your site manager. The links you defined for the left
menu of your site will display here. Click the appropriate link
on this page to enter the content customization subscreen for
that section.
Content
Customization Subscreen (Web Site Field Edit Screen)
Click
any "Field Name" link on the My Company Info screen (shown
above) to access an edit screen for that section of your Web site.
This Web site field edit screen provides you direct editing access
to the associated field on your Web site. If you prefer, you can
use the Web Site Wizard to customize your site through a step-by-step
process. This edit screen is for more experienced users, or those
users who have customized their site but wish to make specific changes
to individual content.
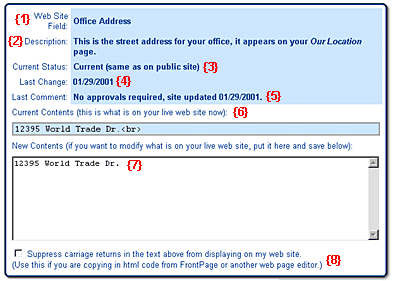
- Web
Site Field
Every customizable section on your site has an associated
field name. Make sure that the information you edit on this screen
is intended for the field that is displayed here.
- Description
This is a brief description of the section you are about to
edit.
- Current
Status
This status display allows you to track the status of the
changes you save and post to your site. You can save unlimited
changes to your site without "posting" them to the live
site or your compliance manager. If you have "Saved"
changes without "posting" them, the Current Status display
will notify you. Likewise, if you have posted changes to your
compliance manager, but they have not yet been reviewed and approved,
this display will notify you.
- Last
Change
This is the date you last saved a change to the associated
Web site field.
- Last
Comment
The last associated comment by your compliance manager is
displayed here.
- Current
Contents
This display lists the exact contents of the "live"
version of this Web site field.
- New
Contents
This is where you edit the associated Web site field. You can
save changes to the Web site field and preview those changes before
you post them to the site.
- Suppress
Carriage Returns
This checkbox is for experienced Web site users. If checked,
the system will not automatically create carriage returns when
you hit the "enter" key while in the edit mode. You
must enter your break and paragraph code using HTML.
Back
to Top
Calculators
Check
the links that you would like to appear in the Calculators section
of the Web site and the Calculators that should appear as featured
items on your home page. The Calculators available for your selection
are determined by your compliance manager if you are assigned to
one.
Back
to Top
Newsletters
- Must be maintained monthly
Check
the links that you would like to appear in the Newsletters section
of the Web site. The Newsletters available for your selection are
determined by your compliance manager if you are assigned to one.
Four new newsletters are added each month and the four oldest newsletters
are dropped from the system. If you have not turned "New Content
On By Default" (see Web Site Options),
then new newsletters will be added automatically to your live site.
If you have set this option to "off," or you are assigned
to a compliance manager who has set this option to "off,"
then newsletters will be added to your site manager only when the
compliance officer approves them and activates them for you.
Back
to Top
Research
Articles
Check
the links that you would like to appear in the Research section
of the Web site. The Research Articles available for your selection
are determined by your compliance manager if you are assigned to
one.
Back
to Top
Site
Style
In
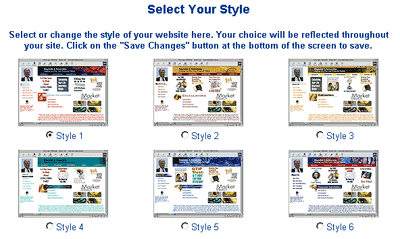
the Site Style section of the Website Administrator, you have the
choice of selecting from six different Web site styles. Make your
selection, click the "Save Changes" button, and then preview
your new site style by clicking the "Preview Changes"
button. If you like the style you have chosen, click the "Submit
Changes" button to post the new style to your live site.
Back
to Top
Customize
Sections
You
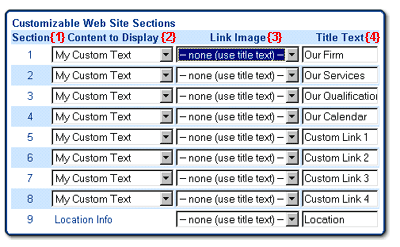
have the freedom to create eight custom links for the left menu
of your site. Use this screen to define the link titles and characteristics
for those links. The buttons you create can link to the content
you entered using the "My Company Info" screens. They
can link to content you have uploaded to the server using the file
upload screens. Or, they can link to Web pages anywhere on the Internet.
This console determines the nature of the links and tells the system
where to find your content. You do not actually use this screen
to enter content into the database.
- Section
There are eight customizable sections. Each section has a
corresponding text input screen that you can access using the
"My Company Info" link.
- Content
to Display
This pull-down menu determines the behavior of your link. You
have three options:
- Section
Disabled
- My Custom
Text - The link will display the text you entered for that
section using the "My Company Info" screens.
- A Different
Web Page - The link will display a Web page anywhere on the
Internet (once you enter the correct URL for that section
in "My Company Info") or the link will display a
Web page you uploaded (once you cut and paste the URL for
that section in "My company Info").
- Link
Image
For custom links, set this option to "none." If
you are using Emerald default links, you can select a graphic
button that fits the style of the site.
- Title
Text
If you set the link image to "none," your link button
will be created using standard HTML text and it will be labeled
with the exact text you enter here.
Back
to Top
Stored
Files
Use
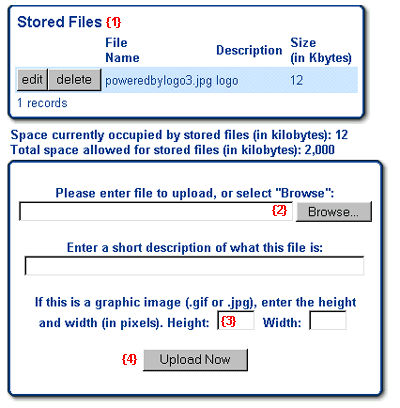
this section to upload and manage your stored graphics and HTML
files.
- Stored
Files
This is a list of the files you have uploaded to the Emerald
server. Once you upload a file, the file name is also displayed
on the "My Company Info" edit screens so you can easily
cut and paste the file name into your customizable sections.
- Edit
- Use this button to change your file descriptions
- Delete
- Use this to remove unwanted files and free space in your
directory
- Browse
This button opens a standard file browser that allows you
to search your local hard drive for a file to upload. If you wish,
you can enter a description of the file before you upload to the
server.
- Height
and Width Settings
When uploading a graphic, specify the dimensions. This will speed
the image loading process if you link to the image from your customizable
content. Should you specify dimensions that are different from
the actual image size, the image will load at those dimensions
but may suffer distortion. Always upload the smallest image size
necessary in order to conserve file space on the server.
- Upload
Now
When you are ready to send the file electronically to the server,
click this button.
Back
to Top
Stock
Ticker
The
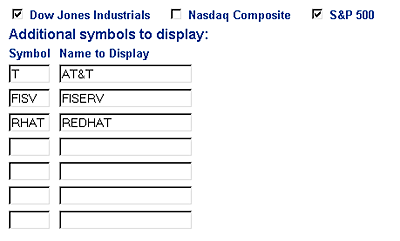
stock ticker is a feature that allows you to create a custom stock
display on your home page. The ticker can be configured to display
the Dow, Nasdaq, and S&P 500 averages, as well as custom titles,
ticker symbols, and 20-minute delayed price quotes.
Simply select
the market averages you wish to display and/or enter up to seven
ticker symbols and associated descriptions. The stock ticker displays
in the main frame of your Web site home page.
Back
to Top
Disclaimer
This is where you disable or enable an optional pre-emptive
disclaimer that will appear when a user first views your Web site,
and define how that disclaimer looks and works.
Note:
This option may already be preset by your compliance manager.
Back
to Top
Licensed
States
This
is where you define in which states you are currently licensed.
Back
to Top
Site
Traffic
The
Site Traffic section of your Site Administrator is where you will
find information on the number of hits the page has received by
month and by particular page. This section is meant to help you
keep track of the traffic that is generated by your Web site.
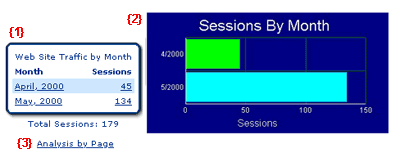
- Monthly
Traffic Summary
Summarizes the total number of hits that the Web page has received
for every month that the Web site is active.
- Monthly
Traffic Summary Graph
Summarizes the total number of hits that the Web page has
received in a graphical form.
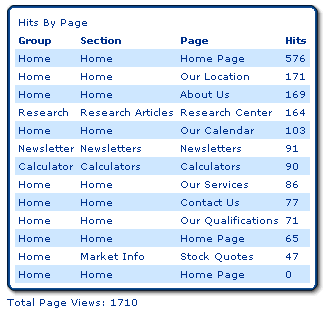
- Analysis
by Page
Click this link to receive traffic information based on each
page in the Web site. (See below.)
Back
to Top
Tell
a Friend Link
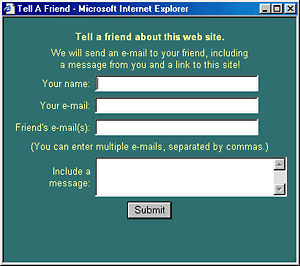
This
feature allows your clients or prospects to send an e-mail to their
family, friends, and associates directly from your Web site by clicking
on the Tell a Friend link located at the bottom of your home page.
When clicked, a separate form window opens(see below), and the user
is prompted to tell their friend(s) about your site. The sent e-mail
will include a link to your Web site and a short message from the
sender.
Back
to Top
©
2001 Emerald Publications
|


